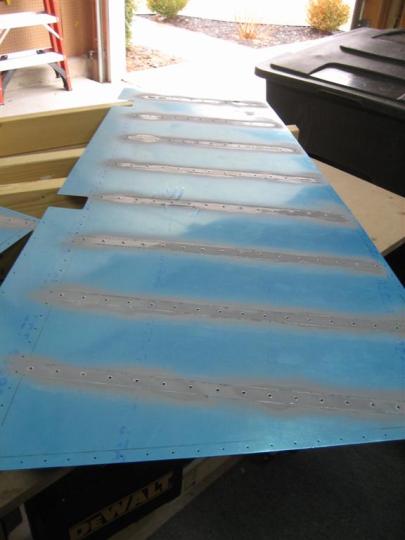
I snuck home over lunch today to get a couple things done, one of which was work on the airplane loudly. First, I set up my c-frame and spent some time verifying, re-verifying, and trip verifying that I was going to dimple in the correct direction. These rudder skins are thin, and I didn’t want to make any mistakes here. I set the skins on the table with the exterior side up, and the c-frame with the male die above, pointing down, and then dimpled all the holes in the skin. Jack and Ginger (who were inside), clearly don’t like me dimpling with the c-frame and told me so with a pair of barks, each. We did get into a nice rhythm, though. [whack] Bark, bark…bark, bark. [whack] Bark, bark…bark, bark. It helped pass the time, but I hope I didn’t cause them too much stress.
After that, I flipped them over and cleaned the scuffed lines.
After drying, I shot them with some self-etching primer. I was at the end of one of the cans, and some of the stuff came out kind of splotchy, but I think it will look good after it dries. I can always lay down another coat.
Another thing. I’ve been putting blue tape on the exterior side, then laying the skins down flat and shooting them with primer. When I do this, some primer gets into the dimple (from the underside I am priming), and kind of bounces off the sticky side of the blue tape and settles in the dimple on the finish side. Today, I made sure none of the holes were obscured; hopefully that will prevent any primer from getting on the exterior surface. I thought about taping the final rivets in the dimples, since that is the next step with the skins anyway, but I am not sure about using self-etching primer on unset rivets, then setting them. I have never seen that done before, and I don’t want to be the first guy to try. I’m sure I would have been okay, but the other way seemed to work fine.
After work, I put rivets in all of the dimples, taped them up, and flipped the skins over to lay the stiffeners in. One note, since I am using the tank dies, the rivet sizes must be lengthened in some places. All of the stiffener rivets were too short before setting, so I am going to substitute AN426AD3-3.5 rivets for the AN426AD3-3s called out in the plans. Except for the aft-most rivet in each row. The construction manual tells you to make sure you set this rivet fully, so I’m going to leave the shorter one in there.
Once you get the stiffener in, you can see they aren’t the recommended 1.5 times diameter. I’m also a little concerned that the dimpled holes are a little big for the rivets. I didn’t notice this on the other components using the tank dies. Hmm. I’m going to look around and see if anyone else has encountered this.
I was moving along merrily until I got to this hole. Doh!
After I got all the rivets in and taped, I flipped the skin over.
Then, one by one, I final trimmed the stiffeners (snipped the 90° corners off with the snips) and laid them in to see what it would look like.
A solid hour and a half. After edge prepping and priming the stiffeners, I should be ready to install the stiffeners permanently.


